Part 3 of my front-end development crash course.
Welcome to my series on learning web development! I created this crash course series to help teach a group of mostly designers at my school about web development, especially on the front-end. This is the third lesson but the first where we learn JS. If you want to start from the beginning, check out the first post.
If you want to play around with the JS snippets as you see them on the slides, you can copy it from this JS file and run it on JSFiddle or something similar.
The very basics
When I was presenting this, one person asked a very good question: “Why JavaScript?”
There are many answers to that, some of which are very opinion based, but in short my reasoning is because it works on a whole lot of devices, from my desktop to phone to some microcontrollers, and because it’s a pretty high level language that is a lot easier (in my opinion) to learn than lower level languages.
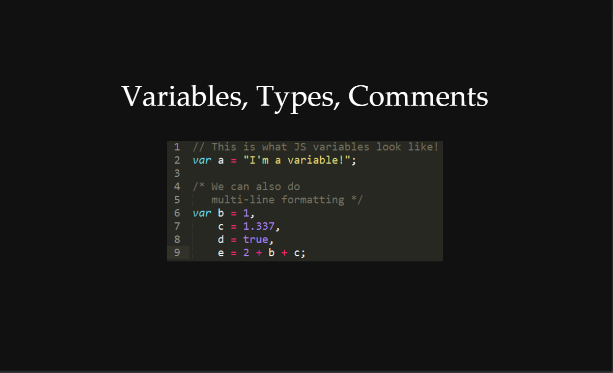
To start out, we have to start with the very base of programming: variables. A variable is simply an object that can hold a value. Every variable in JavaScript is 1 of 4 types: string (character(s)), integers (whole numbers), floats (numbers with a decimal), and booleans (true/false).
We can declare a new variable by saying var then the name we want and optionally give/assign a variable a value using the single equals = operator (operators are characters between variables and/or values that perform certain functions). JavaScript also lets us do calculations in the assignment as you see in line 9 in the image above.
But variables alone aren’t all that helpful. We need some logic!

This is where if and else statements come in. If we want something to happen only when a condition is true, we can put that code inside of an if statement. The format is as you see above, with the code that only runs based on the condition inside of the curly braces.
We can also optionally use elses, which are required to have an if before them. They provide an alternative to the option inside of the if statement. If we only have an if followed by an else, one or the other will be guaranteed to run every time. However, if we combine the else with another if just after it (like in line 4 above), we can check multiple conditions, making sure only one of them is actually ran any given time.
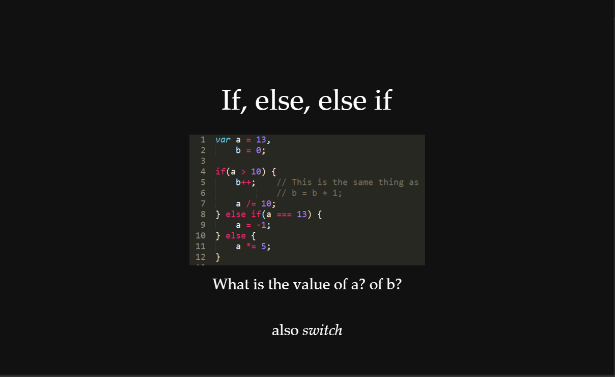
Here’s a made up way to use some if and else statements. The conditions that we’re checking in this example are comparisons. There are some different comparison operators that we should take note of:
< Is the less than operator, which is pretty self explanatory. Similarly we have > the greater than, <= less than or equal to, and >= greater than or equal to operator.
Slightly different are the equal operators, == which is called the equality operator and === which is called the identity operator. Both compare variables or values to each other to see if they’re equal but they do so in slightly different ways. == automatically converts the type when checking whereas === does not. Most of the time you should be using the identity operator ===. You can read more on that here.
In this example we also learn some new assignment operators.
We see b++ which uses the increment operator ++. It is the same as saying b = b + 1, adding to the value of b by 1. Similarly we also have the decrement operator --.
We also see some calculation operators. /= means take the value of the variable to the left and divide it by what’s to the right, the same as a = a / 10 in this case. Similarly we have the *= operator which multiplies, the += operator which adds, and the -= operator which subtracts.
So in this example, what is the value of a and b at the end of these lines?
If we go step by step, we check if the value of a is greater than 10. Since it is, we go into those curly braces and to what it tells us to, namely increment b and divide a by 10. Our current values are a = 1.3 and b = 1.
Something to note is that JavaScript automatically changes a from an integer into a float for us when we do operations like this. Yay for not having to change the type ourselves!
Next is the else. But since we went into the first if, we skip over any remaining chained elses because, as we covered in the last slide, elses only catch (run their code) if the previous parts in the chain are not run.
Thus, we skip over the else if and the else.
As an exercise, what would happen if we changed the value of a to 10 at the start instead?
There is also something called a switch statement which is similar to chained if/elses but isn’t used all that much. If you want to read up on it, check out the Mozilla docs on the subject.
But the computer already keeps track of what these values are. Isn’t there a way to get it to tell us?
Absolutely!
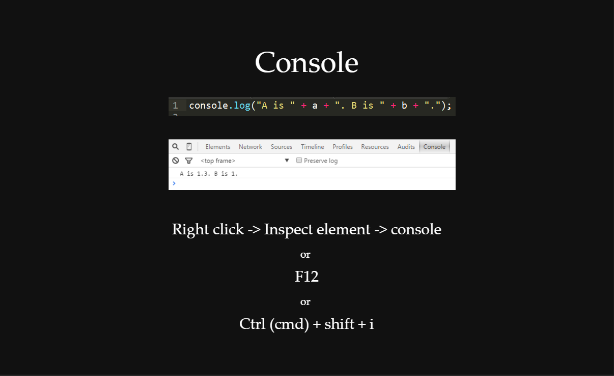
All browsers have something called a console in them which we can interact with using JavaScript. By far the most common command we use in regards to the console is console.log() which prints out stuff for us. In this example, we are printing a formatted string that gives us the value of a and b. They are concatenated with some text, which means they are made into a string and combined.
To see this console, you can use one of the methods shown in the image. An important note is that Mac users, at least on Safari, have to enable this in their browser options. For how to do that, check here.
Now with that base, we can get into some more interesting stuff.
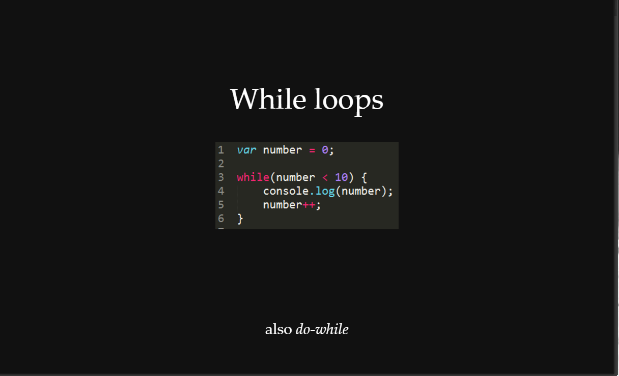
While loops are essentially the same thing as if statements with one addition. If the condition was true and they ran the code inside the braces, it loops back to check the condition and possibly run the code again. This allows us to iterate through a whole range or continually check a condition to see when it changes.
One thing that you have to be especially careful with while loops though is making sure they don’t infinitely run. Allowing them to do so will take up all of the available memory and stop your program (on old computers perhaps also your computer) from running. Modern compilers can catch this type of infinite looping most of the time but it’s still not something that you want to have. As such, assure that an end condition will be met every time you’re working with them.
do-while loops use a similar form but assure that the code will run at least one time. They are much more rarely used. For more information about it, check out the Mozilla page.
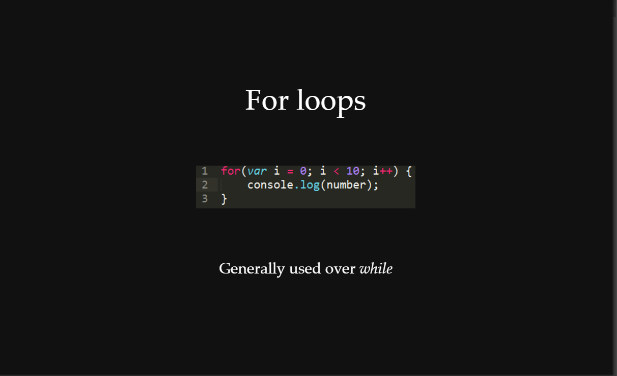
A very similar way to loop with less risk is using a for loop. Most of the time for loops are used instead of while loops but they are pretty interchangeable. The format is as seen above but let’s investigate it.
The first section within the parenthesis is for initialization of variables, usually one, conventionally called i for index (j and k are used if you nest for loops). Often times it will start at 0 but it doesn’t have to.
The second section is after the semicolon and does the condition checking. It effectively acts as an if statement.
The third section is one just for changing the counter value. In this case the index is being incremented by 1 each time. By requiring a change of the counter value here, for loops make it more likely that we don’t forget to change the counter value later or remove it when changing around the way our code works.
Staying Generic
In addition to pure logic, we want to keep things generic so that we don’t have to do as much work.
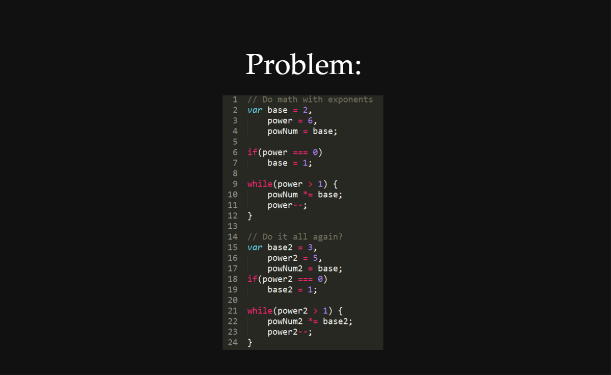
Take for example this code above. In both cases we want to perform a power operation, meaning raise one number by another number. The way shown works but it duplicates code with only variable names changed out.
Think about how if you wanted to do this with 50 or 1000 numbers. With the knowledge we currently have, that’d mean repeating this code that many times! As such we have a problem we need to get around.
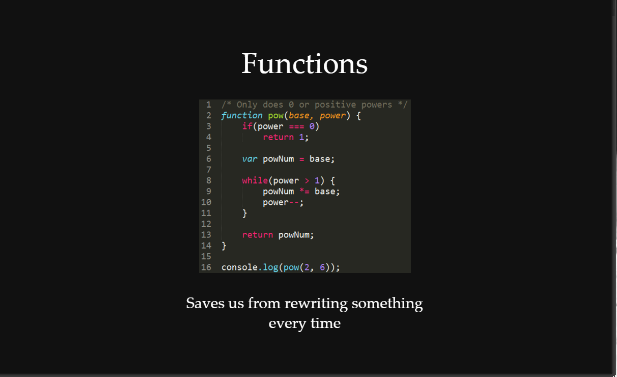
JavaScript and other programming languages get around this by using functions which allows blocks of code to be written once but run as many times we call, instantiate, or invoke which all mean the same thing – that we start it by calling it’s name, in this case pow().
In this example the function requires two parameters or something that you pass into the function. In this case they are called base and power and are expected to be numbers.
It then does the necessary operations to raise the base by the power number. As shown in the example, now we can then just say pow(2, 6); pow(3, 5); and it will do all of what we had on the previous slide. Yay for saving us time and effort!

Here’s a similar problem. We are selecting 5 different buttons and keeping a reference to them with different variables, but this time it’s the same thing just with different indexes on them. To apply a click event listener we have to repeat code for each one again.
We’ll explain more about how to select elements and what events do more in the next section.
So how can we fix this problem of repeating code that just has different indexes?
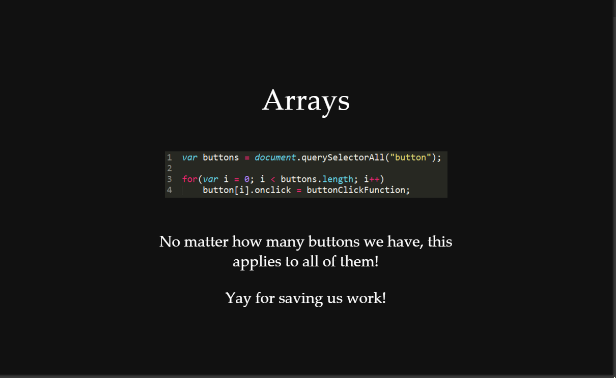
We can use a structure called an array. The code above puts all of the buttons in an array (again, we’ll talk more about the selection process in the next section) and then we can loop through them using a for loop to apply the click event listener. That makes so that regardless of how many buttons there are, 0 or 5000, our click listener will be applied to all of them.
Notice that to access a certain element in the array we need to know its index.
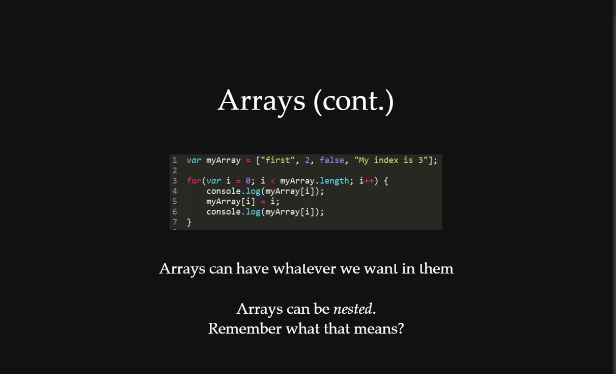
This section of code just shows that arrays can have mixed variable types of elements in them including more arrays, nesting one in the other. Nested arrays are particularly helpful for things like grids when we want to keep track of what’s in what cell.
The example is simply printing what the original contents of the array are, replacing those contents with the index of that location, then printing that index.
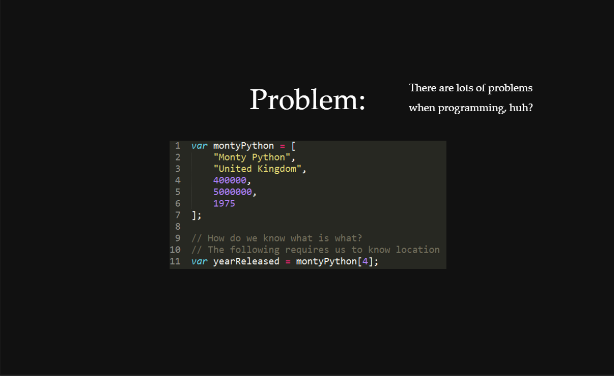
But, what if we have data like what is shown in the above case? It’s all info about the Monty Python Holy Grail movie but what are those values for?
Using only arrays, we have to know exactly what we’re searching for and the index in the array that it is being stored. That’s kind of a pain for data like this.
What if there were a way to organize it in a named fashion?
There is!
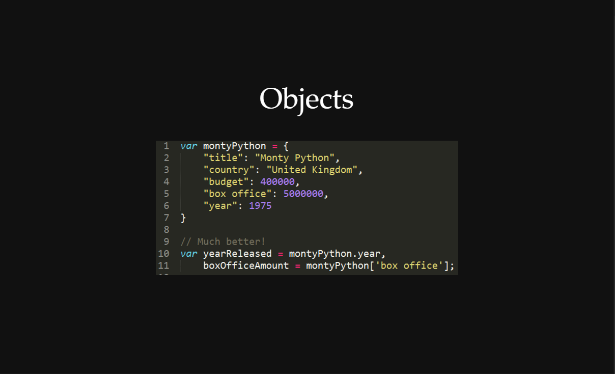
That’s where another data structure called objects come in handy. Objects are comprised of key-value pairs, meaning you can set or lookup certain values based on a string called a key. Just like how real keys open something so you can get what is in it, if you ask an object using a key that it has it will give you back the value for that key. Keys are the part to the left of each semicolon, the values are the part to the right before the comma.
That makes it so that we no longer have to know the index, we can just request the information we want using a key. If the key name doesn’t have a space, we can use the . notation in line 10. If it does have a space in it, we have to use the bracket notation shown in line 11 (though we could always use the bracket notation if we wanted to).
On a side note, notice that I used double quotes " at one point and single quotes ' in another. JavaScript doesn’t care if we do that, it treats them as the same so long as they match up in pairs, but in other languages this may pose a problem. Some languages like C interpret single quotes as what they call char types, or single character strings, and double quotes as strings.
Isn’t isn’t using an object much cleaner than what we tried to do with an array on the previous slide?
And with that, we can handle most all types of data by combining these pieces in the way we need.
Interacting with other things on our page
Now we can do just about all that we want in terms of JavaScript interacting with each other, but how do we connect JS to other parts of our page? We’ll talk about that now.
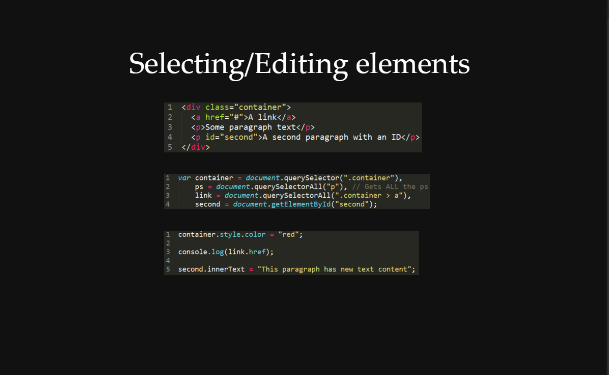
At the top we have some HTML. How can we select the different elements in JS?
It turns out that we can use the same selectors as we did in CSS but with some slight formatting additions. We have to refer to the document, which is very similar to and based on our HTML that we have. We then use .querySelectorAll to be able to use the selectors that we know from CSS. Note that this returns an array of all elements that match the selector we input, so if we want a specific element we have to specify which one we want using [n] at the end where n is some integer within the size of the array returned.
If we wanted to just select the first of an instance, we can use .querySelector instead. It’s effectively the same as .querySelectorAll()[0]. In my experience this JS selector is referred to by QSA commonly.
We can also select using more specific things like .getElementById shown but we could always use query selector or QSA.
Once we’ve selected the elements we want, we can listen for events like clicks, hover, submission, etc. or we can affect attributes and styles that the element has. In the example, we affect the element’s style attribute, specifically the color property, which is like chaining the CSS for the element. Note that JS styles override CSS styles because JS styles are inline, which means directly in the attribute in the HTML.
The other things we do in the example are access the link’s href property, printing it to the console, and set the inner text (meaning the text content) of the second paragraph.
As we’ve seen already, we can listen for events on our elements. In the example given, we listen for the click using onclick and we set that to an unnamed function we created on the spot. We also listen for the onmouseover event and fire our hover function when that occurs.
The point of using a named function over an unnamed one is that you can reuse named functions but can’t reuse unnamed ones because you don’t have a way to refer to them.
There are many more events but I’ll leave that up to you to investigate when you need them.
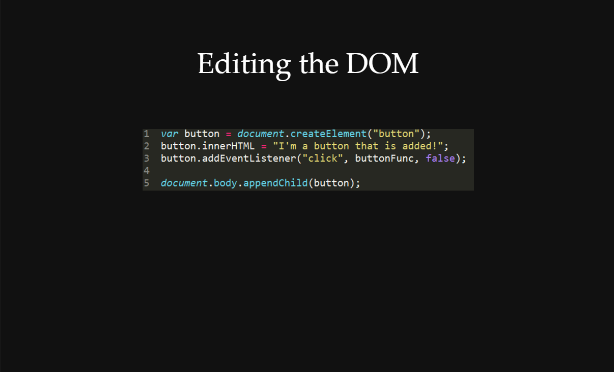
As mentioned in the previous slide’s explanation, we use the document to refer to the elements we want. This is part of the document object model (DOM) which is what our page is actually rendered as, based on the HTML we input. We can change the DOM around as much as we want and our HTML will update accordingly. If you want to know more about this distinction, check out this CSS-Tricks article, especially the resources linked at the end.
In the example shown, we create a button, give it some text and event listener, then have to append it to the DOM using .appendChild. Otherwise it will stay in our JS and not actually move to the DOM.
We can also remove elements (also called nodes) or move them around using some other commands.
What else is there to cover?
Not too much for the purposes of this post, actually.
Some other things worth mentioning

In programming, there are different contexts or scopes. The context that encompasses everything is called the global context. As such, variables that are found within this context/scope are called global variables.
However, there are often smaller contexts within this global context. They are created by functions, loops, and if/else statements. What does this mean in terms of access to variables?
This means that while functions, loops, and if/else statements can access global variables, the global scope cannot access variables created inside of functions, loops, and if/else statements. Because of this, we say that variables are local when they cannot be accessed from anywhere in the JavaScript.
In the example, localVar is initialized inside of myFunction so when we try to use it in line 17 it will give us an error because it is out of scope.
However also note how anotherVar in the example is initialized. Since we didn’t use the var keyword to initialize it inside of the function, the processor assumes that it is in the global scope even though it’s inside of the function. As such, we can access from outside of the function like we do on line 20 in the example. However this practice is not recommended because it makes debugging harder.
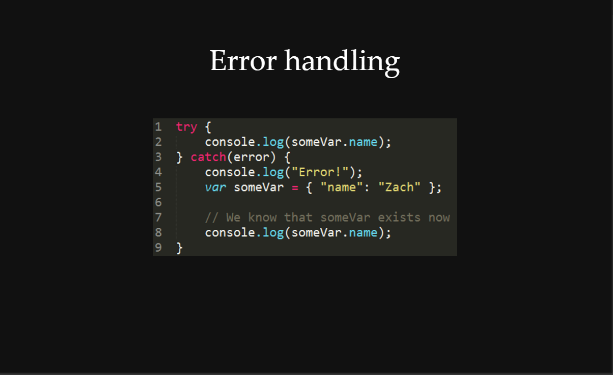
As programmers, we should never want our programs to error out. But, as the world is not perfect, it inevitably happens sometimes. At times we know that something will never error out because it all deals with what we’ve already implemented just before. A lot of the time though we don’t know what type of data may be passed into our function, a variable might not have been initialized, or we may not know what type of variable something may be. At these locations, we can predict that it may error at times and prepare for that.
We do this in part by using try-catch blocks. The format is as you see above. We try the code inside of the first brackets after the try and, if it errors when trying that, we handle it inside of the catch (it catches the error). We can then try an alternative or print out some useful message to people looking.
One thing to note is that by default the first argument in the catch block is the error that occurred. If we want to do anything with that error, we should list it as the first parameter like I did in the example.
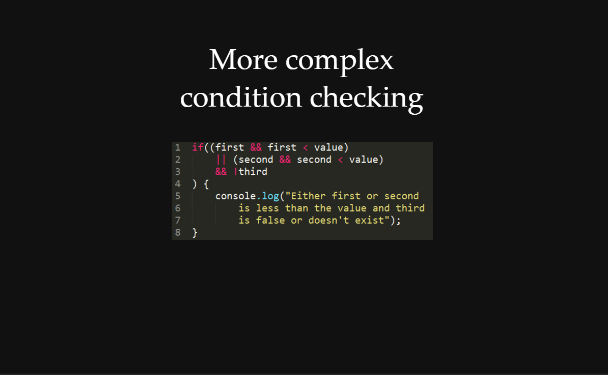
There are also more ways to combine condition checking.
The && and operator makes sure that both the condition to the left and right of it are true before making itself true. The || or operator makes sure that either the condition on the left and/or right of it is true before making itself true. There is also the negation operator ! which reverses the boolean variable it is next to (so if third is true, !third is false). There is also another comparison operator != which checks if two things are not equal.
By chaining condition checks with these operators, we can do things like the example above where it checks to make sure first exists and is smaller than value or second exists and is smaller than the same value in combination with third being false (because !third needs to be true).
If you’re still confused about this I encourage you to try making up some examples and perhaps looking at this Mozilla page on logical operators.
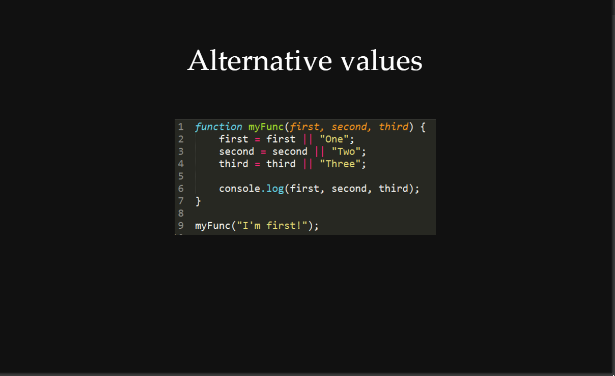
Another useful technique is to provide default values for variables, particularly inside of functions that we create. In the example, myFunc allows for three variables to be passed as parameters but also makes sure that those variables have a default value if no variable is passed. That allows users to pass in anywhere from 0-3 parameters and our function will still work properly.
It does this using the logical or operator ||. What you see in line 2 is the shorthand equivalent to
if (first) first = first;
else first = 'One';
And that’s about it!
But before you go, I have something that I’d like you to do:
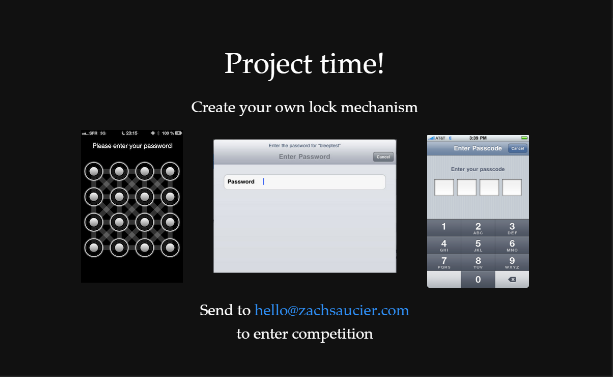
Now you have the knowledge to create a sweet locking mechanism. I don’t care what it is for nor do I care if you use buttons, switches, text input, images, or something else, I just want you to create a project that uses what you’ve learned! The only way to really learn is to practice.
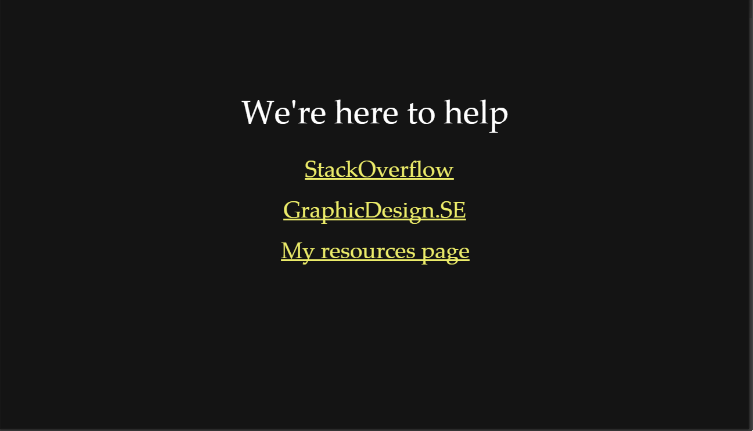
If you’re looking for additional resources on learning JS, check out JavaScript30 so that you can get more practice because that’s really the best way to learn!
And that’s it for now! I’ll see you next time 🙂